
Level Up Your Mixes
A polished mix elevates your music from good to captivating. These audio mixing tips provide foundational techniques for creating professional-sounding tracks, whether you're a songwriter, producer, or independent artist. Learn how proper gain staging, referencing, and strategic use of effects like reverb, delay, and EQ can drastically improve your sound. We'll also cover bus compression and panning for a cohesive and spacious mix. Master these seven audio mixing tips and transform your productions.
1. Start with Proper Gain Staging
Gain staging is the bedrock of a clean, professional mix. It’s the process of strategically managing audio levels at each stage of your signal chain, from the initial recording to the final master. This ensures a healthy signal-to-noise ratio, prevents unwanted distortion, and maximizes your dynamic range. Without proper gain staging, you risk introducing noise, clipping, and a host of other issues that can compromise the quality of your mix. This crucial step is essential for achieving a polished and professional-sounding final product, justifying its top spot on our list of audio mixing tips.

Think of your signal chain as a series of interconnected stages. Each stage—be it a microphone preamp, an equalizer, a compressor, or a virtual instrument—has an optimal operating level. Gain staging is about optimizing the signal level entering and exiting each stage to achieve the best possible sound quality. This prevents the signal from becoming too weak (introducing noise) or too strong (causing clipping or unwanted saturation).
The core principle of gain staging involves finding the “sweet spot” for each piece of hardware and software in your setup. This sweet spot refers to the input level where the equipment performs optimally, delivering the cleanest signal with minimal distortion. For example, a microphone preamp might sound best when the input signal is around -18dBFS (decibels full scale), while a particular compressor plugin might have a recommended input level specified by the manufacturer.
Why is gain staging so crucial?
Proper gain staging offers a wealth of benefits, including:
- Maintains Signal Integrity: By avoiding extreme volume levels, you preserve the original character of your audio, minimizing unwanted artifacts and distortions.
- Prevents Clipping and Unwanted Saturation: Keeping levels in check prevents digital clipping (a harsh form of distortion) and manages analog saturation (which, while sometimes desirable, can be problematic if not controlled).
- Provides Consistent Levels for Processing: Gain staging creates a stable foundation for applying effects and processors, allowing them to work more predictably and effectively.
- Optimizes Dynamic Range and Headroom: By maximizing the usable dynamic range, you have more room to manipulate the loudness and impact of your mix.
Putting Gain Staging into Practice:
Here are some practical tips to implement effective gain staging in your workflow:
- Set Recording Levels Correctly: Aim for a healthy signal without clipping. For digital recording, -18dBFS to -12dBFS is generally a good target range for individual tracks.
- Use Gain Plugins Strategically: Place gain plugins at the beginning of your signal chain, before EQ and compression. This allows you to adjust the input level to each processor optimally.
- Monitor Levels at Each Stage: Use your DAW's meters to keep track of the signal level at every point in the chain. Be mindful of how plugins are affecting the level and adjust accordingly.
- Leave Headroom on Your Mix Bus: Aim for 3-6dB of headroom on your master bus to prevent clipping during the final mastering stage.
- Consult Plugin Manuals: Many plugins provide recommended input levels. Following these guidelines can significantly improve their performance.
Examples of Successful Gain Staging:
- Recording Vocals: Setting the microphone preamp gain so that vocals peak around -18dBFS allows for optimal preamp performance and provides enough headroom to avoid clipping.
- Using Analog Modeling Plugins: Many analog modeling plugins are designed to emulate the behavior of hardware at specific input levels. Maintaining consistent levels ensures these plugins operate as intended.
- Mixing Drums: Applying individual gain adjustments to each drum microphone before sending them to a drum bus allows for better control over the overall drum sound.
Pros and Cons of Gain Staging:
While the benefits are clear, gain staging does require diligence:
Pros: Reduces noise and distortion, allows plugins to operate at their sweet spot, creates more headroom for creative processing, results in cleaner, more professional mixes.
Cons: Requires careful monitoring and adjustment, can be time-consuming to implement properly, may require revisiting throughout the mixing process.
Gain staging, while initially demanding some attention to detail, ultimately simplifies the mixing process and allows for a more polished and professional end product. Mastering this fundamental skill, championed by industry giants like Bob Power, Michael Brauer, and Dave Pensado, is a significant step towards achieving a truly great mix.
2. Use Reference Tracks for Comparison
One of the most effective audio mixing tips for achieving a professional-sounding mix is using reference tracks. Reference mixing involves comparing your mix to commercially successful tracks within the same genre, providing a valuable benchmark for your own work. This technique helps you maintain perspective, ensures your mix translates well across various playback systems, and accelerates your learning process by exposing you to industry-standard mixing practices. This is crucial for aspiring music producers, beginner songwriters, independent artists, and even intermediate creators who want to ensure their music stands up to professional standards.
This process isn't about outright copying; it's about using established tracks as a guide for your tonal balance, dynamics, and overall sonic quality. Imagine sculpting a piece of clay – having a model to reference allows you to better understand proportions, form, and the finer details of your own creation. Similarly, referencing in audio mixing provides a sonic blueprint, helping you shape your mix into a polished and competitive product. Therefore, referencing deserves a prominent spot in any list of essential audio mixing tips.
How Reference Mixing Works:
The core of reference mixing involves critically listening to both your mix and the reference track, alternating between them to identify discrepancies. This A/B comparison helps pinpoint areas where your mix might be lacking, such as weak low-end, harsh high frequencies, or a muddy midrange. By focusing on specific elements like the kick drum, snare, vocals, or overall stereo width, you can make informed decisions about EQ, compression, reverb, and other mixing processes. Remember, your goal isn’t to make your mix sound identical to the reference, but rather to use it as a yardstick to measure your own mix's strengths and weaknesses.
Benefits of Referencing:
- Prevents Mix Tunnel Vision: Spending hours working on a single mix can lead to "ear fatigue" and a skewed perception of your own work. Referencing provides a fresh perspective and helps you identify issues you might have otherwise missed.
- Ensures Commercial Competitiveness: By comparing your mix to commercially successful tracks, you can ensure your music meets industry standards in terms of loudness, clarity, and overall impact. This is essential for independent artists trying to break through in a competitive music landscape.
- Improves Mix Translation: One of the biggest challenges in mixing is ensuring your music sounds good on various playback systems, from car stereos to high-end headphones. Referencing tracks that already translate well helps you achieve the same consistency in your own mixes.
- Accelerates Learning: By analyzing professional mixes, you gain valuable insights into the techniques and processes used by experienced engineers. This accelerates your learning curve and helps you develop a more refined ear for mixing.
Examples of Effective Referencing:
- A hip-hop producer struggling with low-end clarity might reference Dr. Dre's 2001 album, renowned for its powerful and defined bass.
- A rock mixer aiming for a dynamic and energetic sound might use Led Zeppelin IV as a reference for its wide dynamic range and punchy drums.
- A pop producer working on a radio-ready single might compare their mix to recent Billboard hits to understand current trends in vocal processing and overall sonic aesthetics.
Tips for Effective Referencing:
- Genre and Era Matching: Choose references from the same genre and, ideally, a similar era as your own track. This ensures a relevant comparison and avoids stylistic clashes.
- Level Matching: Accurately match the loudness of your mix and the reference track to avoid being misled by volume differences.
- Focus on Specific Elements: Rather than trying to emulate the entire sound of the reference, focus on specific elements like the kick, snare, vocals, or bass.
- Use Multiple References: Avoid over-reliance on a single reference track by using several different tracks. This provides a broader perspective and prevents you from inadvertently copying one specific sound.
- Reference at Different Volume Levels: Check your mix against references at both low and high volumes to ensure it translates well across a range of listening environments.
Potential Pitfalls:
While referencing is a powerful tool, it's important to be mindful of potential pitfalls. Over-imitation can stifle creativity, so focus on learning from the references rather than copying them outright. Also, remember that different mastering approaches can significantly impact the final sound, so don't be discouraged if your mix doesn't perfectly match a mastered reference track. Finally, always be critical of your references, understanding that not every commercially successful track is necessarily a shining example of perfect mixing.
By using reference tracks strategically and critically, you can significantly improve your mixing skills, ensuring your music sounds polished, professional, and competitive in the modern music landscape.
3. Create Depth with Reverb and Delay
One of the most crucial audio mixing tips for creating a professional and immersive soundscape is understanding how to use reverb and delay. These two powerful effects are cornerstones of spatial processing, giving your mix the illusion of three-dimensional space by placing instruments at varying perceived distances from the listener. This not only helps separate instruments occupying similar frequency ranges, preventing a “muddy” sound, but also adds emotional impact and a more engaging listening experience by simulating the acoustics of real-world environments. Mastering these tools elevates a mix from flat and lifeless to rich and captivating.
Reverb simulates the reflections of sound within a space. Imagine the difference between clapping your hands in a small closet versus a large cathedral. The cathedral’s extended decay and complex reflections are what reverb emulates. Delay, on the other hand, creates discrete echoes of a sound, repeating at set intervals. This can create rhythmic textures, add a sense of space, or even thicken a sound. Used in conjunction, these effects can conjure a sonic landscape that draws the listener in.
Numerous artists have effectively used reverb and delay to define their signature sound. Pink Floyd's masterful use of delay on "The Dark Side of the Moon" created otherworldly soundscapes. Phil Collins' iconic gated reverb on the drums in "In the Air Tonight" added a dramatic punch. Bon Iver uses extensive reverb to create an ethereal atmosphere, while dub reggae pioneers like Lee 'Scratch' Perry have pushed the boundaries of delay, transforming it into a creative instrument in its own right. These diverse examples highlight the versatility and creative potential of these effects.
So, how can you implement these powerful audio mixing tips in your own mixes? Here are some actionable tips:
- Start Small, Then Expand: Use shorter reverb times for instruments you want to sound closer to the listener and longer reverb times for instruments you want to push further back in the mix. This creates a sense of front-to-back positioning within your sonic space.
- Clean Up the Low End: Reverb can introduce unwanted muddiness, especially in the lower frequencies. Applying a high-pass filter to your reverb returns can remove this low-frequency buildup, keeping the mix clean and defined.
- Consider the Environment: Match the characteristics of your reverb (e.g., room size, decay time) to the environment you want to evoke. A small room reverb might suit a folk song, while a large hall reverb might work better for an orchestral piece.
- Maintain Clarity with Pre-Delay: Pre-delay introduces a short gap between the original sound and the onset of the reverb. This helps maintain the clarity and definition of the source sound, preventing it from becoming washed out.
- Dynamic Movement with Automation: Automate your reverb sends for dynamic spatial movement. You can subtly increase the reverb on a vocal during a chorus to create a sense of lift and intimacy, or decrease it during a verse to create a more intimate feel.
The following infographic visualizes the key components to consider when crafting spatial depth with reverb and delay. The central concept, "Spatial Processing," branches out to illustrate how decay time, pre-delay, and high-pass filtering on the reverb return contribute to the overall effect.
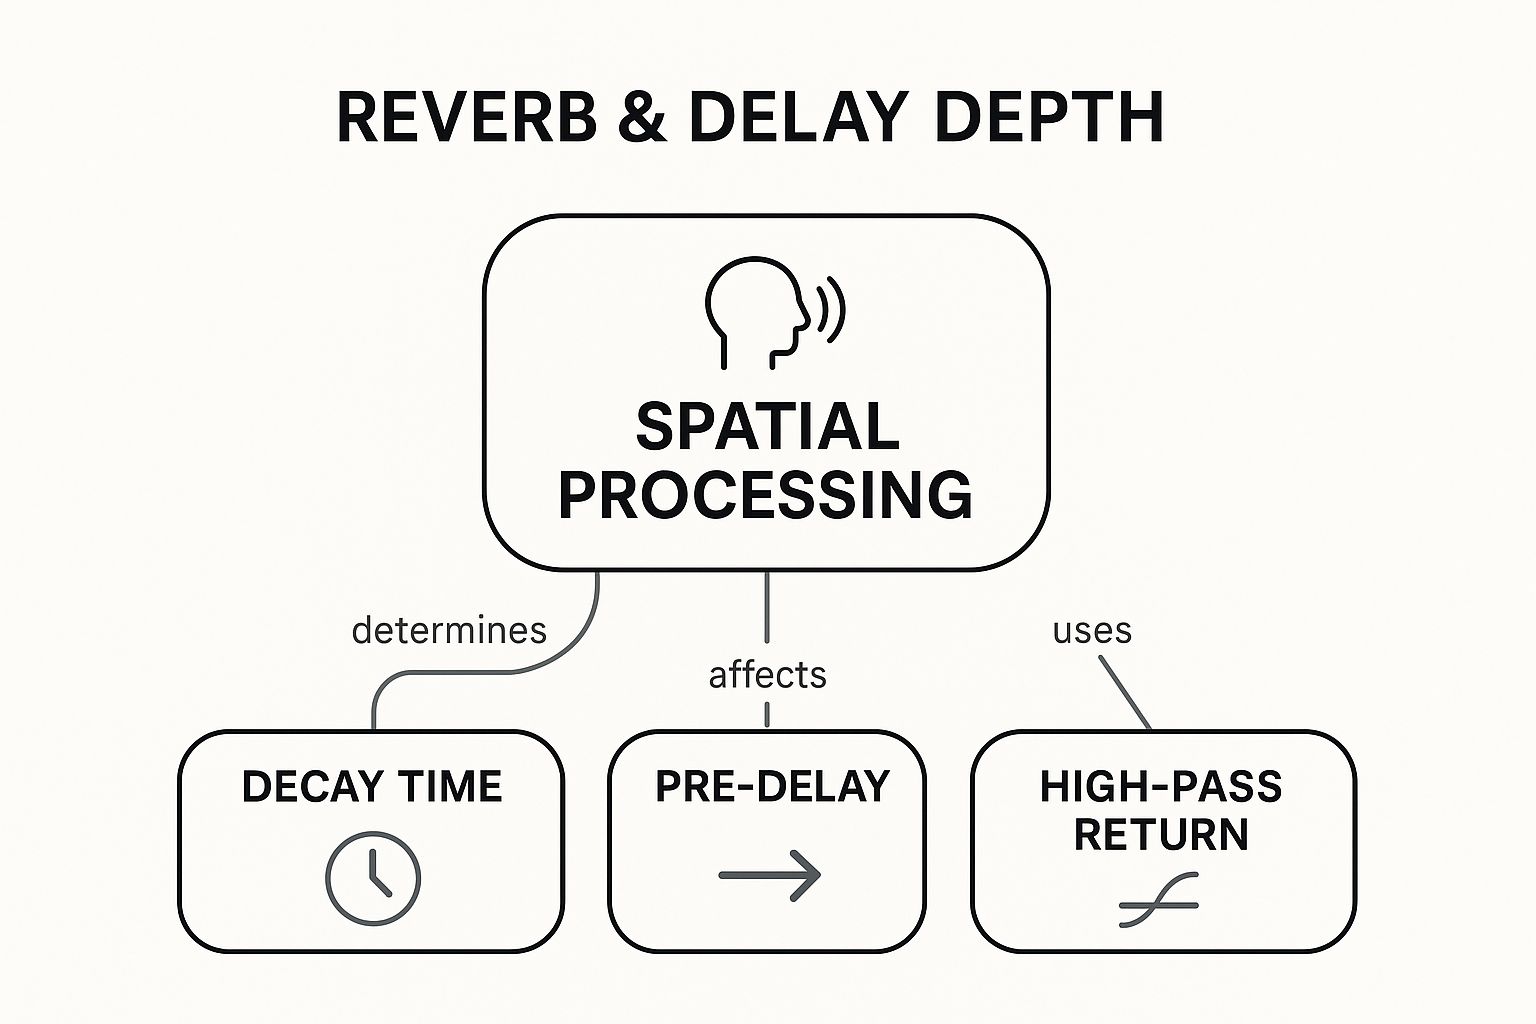
The infographic highlights the interconnectedness of these three parameters, demonstrating how manipulating decay time creates the sense of space, pre-delay maintains clarity, and high-pass filtering ensures a clean, defined sound. By understanding these relationships, you can sculpt your reverb and delay effects with greater precision.
While reverb and delay offer immense creative potential, they can also be detrimental if overused. Too much reverb can muddy the mix, reducing clarity and definition. Conversely, excessive delay can clutter the sonic space and create a disorienting effect. Careful EQing and judicious use are essential to achieve a balanced and polished sound. By understanding the interplay between these two powerful effects and following these audio mixing tips, you can transform your mixes, adding depth, emotion, and a professional touch.
4. Apply the High-Pass Filter Liberally
One of the most impactful yet often overlooked audio mixing tips is the liberal application of the high-pass filter (HPF). This seemingly simple tool can dramatically improve the clarity and punch of your mixes by surgically removing unnecessary low-frequency content. Mastering this technique is a cornerstone of professional audio mixing, allowing you to create space in your low end, enhance instrument separation, and prevent the dreaded “muddy” mix. For aspiring music producers, beginner songwriters, independent artists, and even intermediate creators, understanding the power of the HPF is essential for crafting professional-sounding tracks.
So, what exactly does a high-pass filter do? It acts as a sonic gatekeeper, allowing frequencies above a certain threshold to pass through while attenuating everything below it. Think of it like a sieve that separates the larger pieces from the finer grains. In the context of audio, this means removing low-frequency rumble, mud, and resonance that can clutter the mix. This subtractive EQ technique is far more effective than boosting higher frequencies to achieve clarity, as it deals with the problem at the source.
The benefits of using a HPF extend far beyond simple clarity. By removing unnecessary low-end information, you create space for crucial low-frequency elements like the bass guitar and kick drum to shine. This prevents frequency masking, where overlapping frequencies compete for sonic space, resulting in a loss of definition and impact. Imagine a crowded room where everyone is talking at once – it's difficult to understand any single conversation. Applying a HPF is like clearing out some of the crowd, allowing individual voices (instruments) to be heard more clearly. Furthermore, reducing the amount of low-frequency energy in your mix can ease the strain on playback systems, preventing distortion and allowing for greater headroom.
Here's how this translates into practical application. Imagine recording vocals where a low rumble from air conditioning or traffic bleeds into the microphone. Applying a high-pass filter around 80-100Hz can effectively eliminate this unwanted noise without affecting the core frequencies of the vocal performance. Similarly, electric guitars often contain low-frequency rumble that muddies the mix. A HPF set around 100-150Hz can clean up the guitar's sound, allowing it to cut through the mix with greater precision. Even instruments like pianos can benefit from high-pass filtering, creating space for the bass guitar and preventing the low end from becoming overly dense. Removing excess low end from overhead drum mics can also brighten the cymbals and add clarity to the overall drum sound.
While the advantages are numerous, it’s important to be mindful of the potential drawbacks. Over-filtering can make instruments sound thin and lifeless, stripping away their natural warmth and fullness. Like any powerful tool, it requires careful and judicious use. The key is to listen critically and find the right balance between clarity and fullness.
Here are some actionable audio mixing tips for effectively using the high-pass filter:
- Start with a gentle slope: Begin with a 12dB/octave slope. This provides a more musical roll-off than steeper slopes (e.g., 24dB/octave), preserving the natural character of the instrument.
- Sweep and listen: While playing the track, slowly sweep the cutoff frequency upwards until you hear the instrument start to sound thin. Then back the frequency down slightly to find the sweet spot where the low-end mud is removed without compromising the instrument's body.
- Context is key: The optimal cutoff frequency will vary depending on the instrument, the arrangement, and the overall sonic aesthetic you're aiming for. A dense mix may require more aggressive filtering than a sparse one.
- Leave the low-end instruments alone (mostly): Avoid aggressive high-passing on instruments that are fundamental to the low end, such as the bass guitar, kick drum, and floor toms. Subtle filtering can be applied in certain cases, but proceed with caution.
- Check in mono: After applying high-pass filters, always check your mix in mono to ensure that phase cancellations aren't occurring. Excessive low-frequency filtering can sometimes create phase issues that are only apparent in mono.
Pioneering mixers like Andy Wallace, Tom Elmhirst, and Serban Ghenea have long championed the strategic use of high-pass filtering. By incorporating this fundamental technique into your audio mixing workflow, you can significantly elevate the clarity, punch, and professional polish of your music. Don't be afraid to experiment and find what works best for your individual tracks, and remember: sometimes, less is more. Subtractive EQ, when employed skillfully, can be the secret weapon in your mixing arsenal.
5. Use Bus Compression for Glue
One of the secrets to a professional-sounding mix is the subtle yet powerful technique of bus compression, also known as mix bus compression or glue compression. This crucial audio mixing tip involves applying compression to groups of instruments (like drums, vocals, or all the instruments in a particular frequency range) or even the entire mix. This creates a sense of cohesion and “glue” between the elements, making them sound less like individual tracks and more like a unified, polished whole. Think of it as the invisible hand that ties your mix together, adding punch, energy, and that elusive professional sheen.
Bus compression works by gently reducing the dynamic range of the grouped audio. This means that the louder parts of the signal are reduced in volume, while the quieter parts are left relatively untouched or even boosted. This creates a more even and controlled sound, making the overall mix feel fuller and more consistent. It also emulates the behavior of analog consoles, which naturally compress audio as it passes through their circuitry, contributing to their sought-after warmth and character. This is why bus compression is a staple technique in genres ranging from rock and pop to electronic and hip-hop.
Why Does This Deserve a Spot in Our Top Audio Mixing Tips?
Bus compression is a powerful tool because it addresses a common challenge in mixing: making individual tracks gel together seamlessly. Without it, a mix can sound disjointed and amateurish, even if the individual tracks are well-recorded and processed. By subtly controlling dynamics and adding a touch of "glue," bus compression elevates the entire mix, giving it a professional, radio-ready quality.
Features and Benefits:
- Cohesion: This is the core benefit. Bus compression blends instruments together, creating a unified sonic landscape.
- Punch and Energy: By controlling dynamics, bus compression can make a mix sound more impactful and exciting.
- Gentle Dynamic Control: Unlike individual track compression, bus compression is generally applied more subtly, preserving the natural dynamics of the individual elements while still shaping the overall sound.
- Analog Console Emulation: Bus compression can impart a warmth and character reminiscent of classic analog consoles.
- Creates a Sense of Space and Air: By subtly reducing the dynamic range, quieter details in the mix can become more audible, creating a greater sense of depth and space.
Pros and Cons:
Pros:
- Cohesive and professional-sounding mixes
- Analog-style warmth and character
- Improved control over overall dynamics
- Enhanced sense of space and air
Cons:
- Can reduce individual track dynamics if overdone
- May cause "pumping" (an audible rhythmic fluctuation in volume) if settings are too aggressive
- Requires careful gain staging to avoid distortion
Examples of Successful Implementation:
- SSL G-Series Bus Compressor: A classic choice for rock and pop mixes, known for its smooth and transparent glue.
- Neve 33609 Compressor: Highly regarded for its vintage character and ability to add weight and depth.
- API 2500: Offers punch and aggression, making it suitable for drum buses or mixes that need extra energy.
- Fairchild 670 Emulation: Renowned for its smooth and musical compression, often used on vocal buses.
Actionable Tips for Using Bus Compression:
- Start Subtly: Begin with a low ratio (2:1 to 4:1) and aim for only 1-3 dB of gain reduction. Gradually increase the compression as needed, listening carefully to the effect on your mix.
- Slow Attack: Use a slow attack time to allow transients (the initial impact of a sound) to pass through uncompressed, preserving punch and clarity.
- Auto-Release or Medium Release: Experiment with both auto-release and medium release settings to find what works best for your mix. A faster release can create a more energetic sound, while a slower release provides a smoother, more relaxed feel.
- Gain Staging is Crucial: Ensure your mix bus isn't clipping before applying compression. Proper gain staging will prevent distortion and allow the compressor to work more effectively.
- A/B Test: Regularly bypass the compressor to compare the compressed and uncompressed versions of your mix. This will help you ensure that the compression is enhancing the mix rather than detracting from it.
Popularized By:
Legendary mix engineers like Chris Lord-Alge, Bob Clearmountain, and Spike Stent have helped popularize the use of bus compression as a key ingredient in their iconic mixes.
By following these audio mixing tips and understanding the nuances of bus compression, you can significantly improve the quality and professionalism of your mixes. It’s a powerful tool that, when used effectively, can elevate your sound to the next level.
6. Pan strategically for separation
Panning, the positioning of audio signals within the stereo field (left and right speakers), is a fundamental audio mixing tip that drastically impacts the clarity, width, and overall impact of your music. Strategic panning involves thoughtfully placing instruments across this stereo spectrum, creating a three-dimensional soundscape that draws the listener in and allows each instrument to shine. This technique isn't merely about filling out the stereo image; it's a crucial tool for achieving a professional and polished mix. By understanding and applying strategic panning, you can elevate your mixes from amateur to pro, enhancing the listening experience and making your music truly captivating.

This audio mixing tip deserves its place on this list because it addresses a core challenge in music production: frequency masking. When multiple instruments occupy similar frequency ranges, they can clash and obscure each other, resulting in a muddy and undefined sound. Strategic panning provides a solution by physically separating these instruments in the stereo field, allowing our ears to distinguish them more clearly. This improved separation not only enhances clarity but also creates a wider, more spacious mix.
Strategic panning works by leveraging the way our brains perceive sound. When a sound comes from the left, our left ear hears it slightly louder and sooner than our right ear, and vice versa. This subtle difference in timing and volume allows us to locate the sound source. By manipulating the pan controls in your digital audio workstation (DAW), you can precisely position each instrument within the stereo image, creating a sense of space and depth.
The benefits of strategic panning are numerous. It dramatically improves instrument separation, reduces frequency competition, and allows each element to be clearly heard. It creates wider, more spacious mixes that sound professional and polished. Furthermore, by carefully positioning elements in the stereo field, you establish mix balance and symmetry, enhancing the overall listening experience.
However, like any mixing technique, panning can be overdone. Excessively wide panning can sound unnatural and may not translate well to mono playback systems, such as older radios or Bluetooth speakers. It's crucial to check your mix in mono regularly to ensure compatibility across different listening environments.
There are several established approaches to panning. One popular method is LCR (Left-Center-Right) panning, which focuses on placing instruments in either the hard left, hard right, or center positions. This technique prioritizes clarity and ensures compatibility with mono systems. Another common approach is to pan similar instruments, such as layered guitars or backing vocals, to opposite sides of the stereo field. This creates a sense of width and fullness without sacrificing clarity.
Let's look at some examples of successful panning in action. The Beatles, under the guidance of producer George Martin, were early pioneers of hard panning, frequently placing instruments entirely to the left or right. This technique contributed to the distinct and energetic sound of their early recordings. Led Zeppelin also used panning effectively, layering Jimmy Page's guitars across the stereo field to create a powerful and immersive sonic experience. Modern pop music often features wide background vocals, creating a lush and ethereal atmosphere. Jazz recordings, on the other hand, often prioritize a more natural instrument positioning, mimicking the way a band would be arranged on a stage.
Here are some actionable audio mixing tips for using panning strategically:
- Keep the low-end centered: Bass, kick drum, snare, and lead vocals are typically placed in the center to provide a solid foundation and ensure they translate well to mono. This anchors the mix and prevents the low frequencies from becoming unbalanced.
- Pan similar instruments to opposite sides: As mentioned earlier, this creates width and separation without muddying the mix. Experiment with different panning positions to find the sweet spot for your specific instruments.
- Use the LCR method for clarity: When in doubt, start with LCR panning. It’s a simple yet effective way to create a balanced and well-defined stereo image.
- Check your panning in mono: This is crucial for ensuring compatibility across different playback systems. If your mix sounds drastically different in mono, you may need to adjust your panning decisions.
- Consider the listener's perspective: Imagine yourself listening to the music through headphones or speakers. Does the panning feel natural and comfortable? Does it enhance the listening experience or detract from it?
By understanding the principles of strategic panning and applying these practical audio mixing tips, you can significantly improve the quality of your mixes. This fundamental technique is essential for achieving professional-sounding results and creating music that truly engages the listener. From aspiring music producers to seasoned professionals, understanding how to effectively pan instruments within the stereo field is a crucial skill for anyone involved in audio production.
7. Cut Before You Boost with EQ
In the pursuit of a polished and professional mix, equalization (EQ) plays a vital role. However, many aspiring mixers fall into the trap of boosting frequencies to achieve their desired sound. While boosting can be effective in some cases, a more nuanced and often superior approach involves cutting frequencies before boosting – a principle that emphasizes subtractive EQ. This technique lies at the heart of effective audio mixing tips, offering a pathway to cleaner, more natural-sounding mixes. By strategically removing unwanted frequencies before adding enhancements, you can create space in the mix, prevent frequency buildup, and achieve a more balanced overall sound. This approach, popularized by industry giants like Bob McCarthy, Dennis Bohn, and Ethan Winer, focuses on the philosophy that it's often more effective to remove what you don't want rather than emphasize what you do.
How exactly does this work? Imagine a muddy mix where the bass guitar and kick drum are fighting for sonic space. Instead of boosting the higher frequencies of the bass to make it "cut through" the mix, which could lead to a thin and unnatural sound, you would first cut the muddy frequencies (typically in the 200-400Hz range) on the bass guitar. This cleaning up process creates space for the kick drum and other instruments, ultimately leading to a clearer, more defined low end. This method maintains the natural tonal character of the bass while solving the underlying issue of muddiness.
This approach is beneficial in numerous scenarios. For instance, if vocals sound harsh, rather than immediately boosting the "air" frequencies, try cutting the harsh frequencies first, often found between 2-4kHz. This subtractive approach preserves the natural vocal timbre while eliminating the unwanted harshness. Another common example involves notching out resonant frequencies on individual tracks before enhancing their tone. This ensures a smoother, more balanced sound without accentuating any problematic resonances. Even adding warmth can benefit from this approach; high-passing a track before boosting low-mid frequencies prevents unnecessary buildup in the lower registers, allowing the added warmth to shine through without muddying the mix.
Implementing the "cut before you boost" principle offers several distinct advantages:
- Sounds More Natural: By focusing on removing problematic frequencies, you retain the original character of the sound source, avoiding the artificial and sometimes exaggerated quality that excessive boosting can produce.
- Prevents Phase Issues: Boosting frequencies can introduce phase shifts, which can lead to comb filtering and other undesirable sonic artifacts. Cutting frequencies is less likely to cause these issues.
- Uses Less Processing Power: Subtractive EQ generally requires less processing power than boosting, contributing to a more efficient workflow and reducing the strain on your CPU.
- Creates Better Separation Between Instruments: By carving out space for each instrument in the frequency spectrum, you achieve greater clarity and definition in the mix, allowing each element to shine through.
However, like any mixing technique, this approach has its potential downsides:
- May Not Provide the Immediate Gratification of Boosting: Boosting can often deliver a quick and noticeable change, which can be tempting for beginners. Cutting requires more patience and a deeper understanding of frequencies.
- Requires More Analytical Listening Skills: Identifying problematic frequencies requires careful listening and a trained ear.
- Can Make Tracks Sound Thin if Overdone: Overly aggressive cutting can strip away too much of the sound's body and richness, resulting in a thin and lifeless sound.
To effectively utilize this powerful technique, consider the following audio mixing tips:
- Sweep with a narrow Q: Use a narrow bandwidth (high Q) EQ to sweep across the frequency spectrum and pinpoint the exact problem frequencies. Listen for resonances, muddiness, or harshness.
- Use Wider Q Settings for Musical Cuts: Once you've identified the problematic frequency, widen the Q for a more musical and natural-sounding cut.
- Cut Problem Frequencies First, Then Consider Gentle Boosts: Always address unwanted frequencies before adding any boosts. If boosts are still needed after cutting, apply them subtly.
- Use Spectrum Analyzers: Visual tools like spectrum analyzers can be invaluable in identifying frequency buildup and confirming your listening decisions.
- Make Subtle Cuts: Start with small cuts of 2-3dB. Often, these subtle adjustments make a significant difference. Avoid dramatic cuts unless absolutely necessary.
By embracing the "cut before you boost" principle, you'll not only improve the quality of your mixes but also develop a more refined and professional approach to audio mixing. This fundamental technique empowers you to create mixes that sound natural, balanced, and polished, solidifying its place as an essential audio mixing tip for aspiring and experienced producers alike.
7 Key Audio Mixing Tips Comparison
| Tip | 🔄 Implementation Complexity | 🛠️ Resource Requirements | ⭐ Expected Outcomes | 💡 Ideal Use Cases | ⚡ Key Advantages |
|---|---|---|---|---|---|
| Start with proper gain staging | Medium – requires careful level monitoring and adjustments | Moderate – requires metering tools and careful listening | High – cleaner mixes with reduced distortion 📊 | Recording and mixing stages needing optimal headroom | Reduces noise and distortion, maximizes dynamic range |
| Use reference tracks for comparison | Low – involves comparing and level matching | Low – needs reference tracks and comparison tools | High – mixes translate better across systems 📊 | Ensuring mix competitiveness and tonal balance | Prevents mix tunnel vision, speeds learning process |
| Create depth with reverb and delay | Medium – requires parameter tweaking and creative judgment | Moderate – access to quality reverb/delay plugins | High – adds space, dimension, and emotional impact 📊 | Enhancing mix depth and spatial effect | Makes mixes more immersive and professional sounding |
| Apply the high-pass filter liberally | Low – straightforward EQ adjustment | Low – standard EQs suffice | Medium – clearer mixes with less low-end muddiness 📊 | Cleaning low end in dense arrangements | Dramatically improves clarity and prevents frequency masking |
| Use bus compression for glue | Medium – setting compressor parameters optimally | Moderate – requires bus compressors and monitoring | High – cohesive and punchy mixes 📊 | Final mix or group buses needing cohesion | Adds analog warmth, controls dynamics smoothly |
| Pan strategically for separation | Low to Medium – involves creative placement decisions | Low – standard panning controls | High – improved separation and stereo image 📊 | Creating mix width and clarity | Enhances instrument distinction, creates width |
| Cut before you boost with EQ | Medium – requires analytical listening and precise EQ use | Low – standard EQ tools | High – natural tonal balance and less masking 📊 | Cleaning problem frequencies before enhancement | Prevents frequency buildup, maintains natural sound |
Unlock Your Mixing Potential
This article has covered some essential audio mixing tips, from foundational steps like gain staging and EQing, to more advanced techniques such as using bus compression and creating depth with reverb and delay. Remember the importance of referencing other tracks, strategically panning elements for a wider stereo image, and the power of subtractive EQ—cutting frequencies before boosting them. By mastering these audio mixing tips, you'll be well on your way to crafting professional-sounding mixes that truly capture the emotion and energy of your music. These skills are not just technical steps; they are the keys to unlocking your creative vision and bringing your artistic ideas to life.
Taking these concepts from theory to practice is where the real magic happens. Experiment with the techniques discussed, listen critically to your mixes, and keep refining your approach. The journey to becoming a skilled audio mixer is an ongoing process of learning and discovery.
Want to dive deeper into the world of audio mixing and take your skills to the next level? ChordX offers a wealth of resources, from in-depth tutorials and expert advice, to comprehensive reviews of DAWs, plugins, and hardware specifically designed to enhance your mixing workflow. Explore ChordX today and unlock your full mixing potential!


