
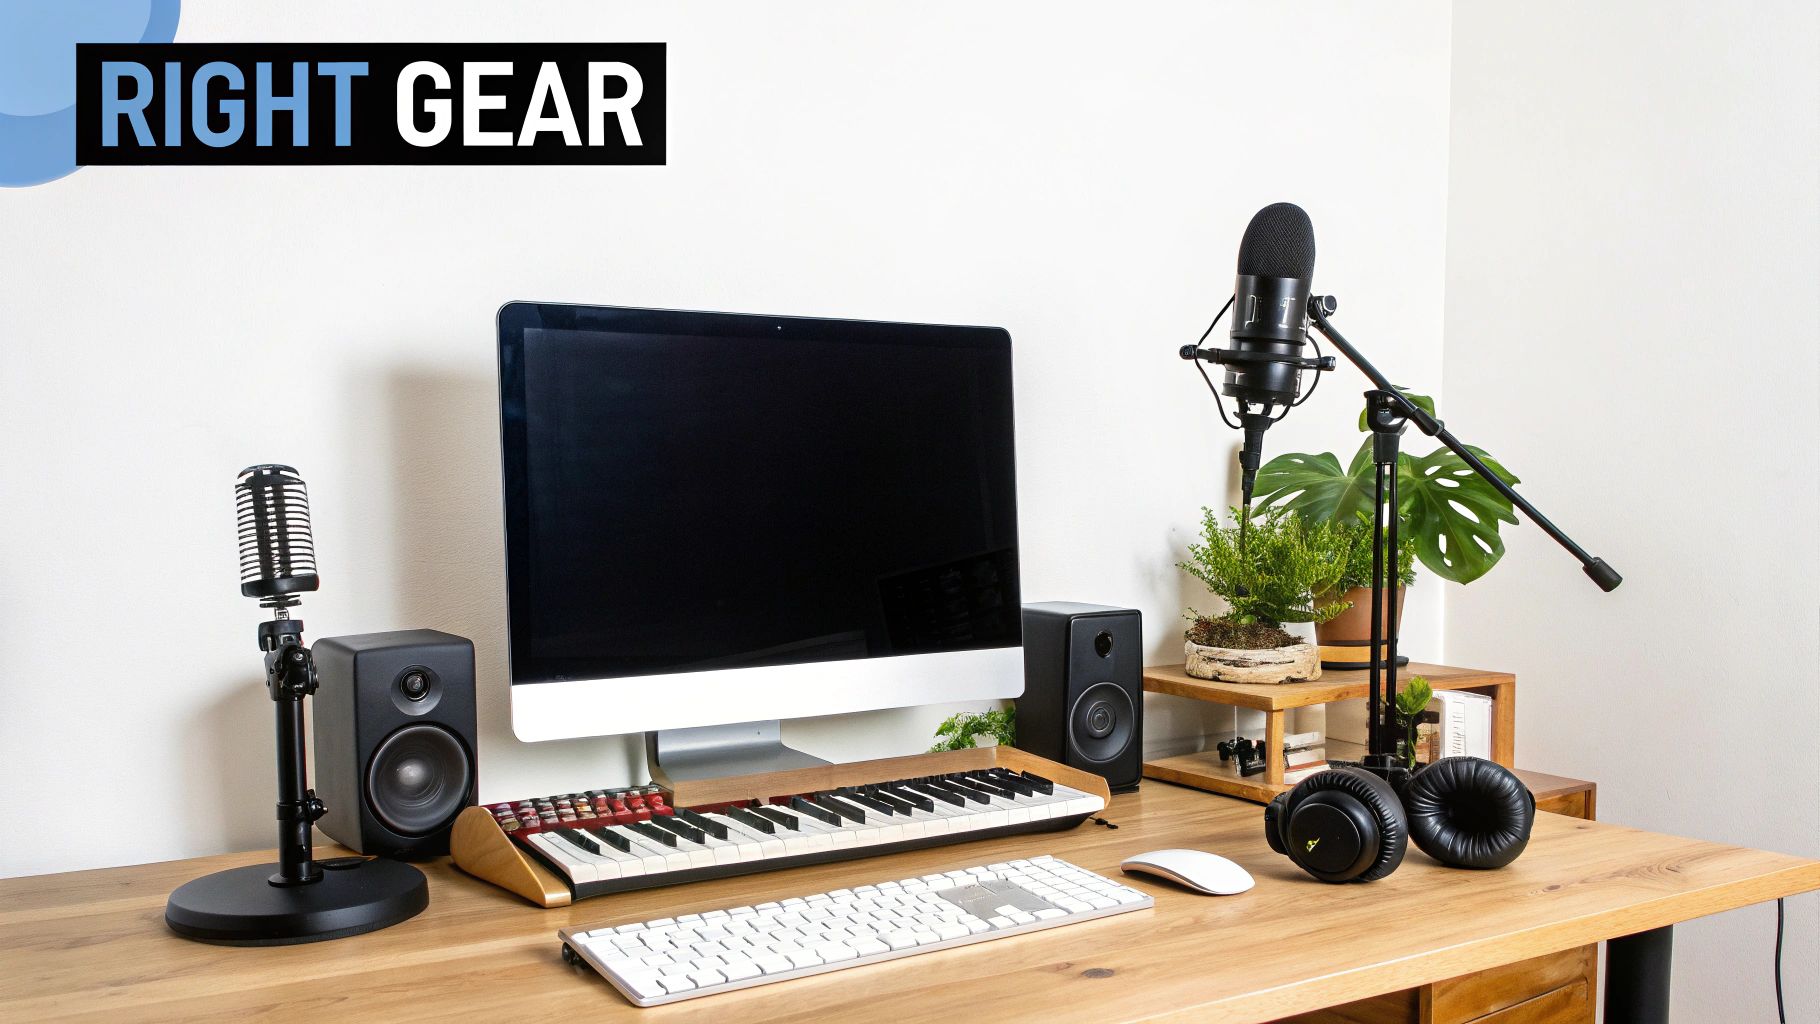
Creating Your Home Recording Space That Actually Works
Your bedroom probably wasn't designed with acoustic perfection in mind. However, many artists have converted spare rooms, closets, and even kitchen pantries into surprisingly professional recording studios. This means you don't need a dedicated sound booth to produce high-quality music at home. You might be interested in: How to master music production for beginners.
Choosing the Right Room
The first step is selecting the right room. A smaller room is often preferable to a larger one because it minimizes unwanted reverberations. Rooms with soft furnishings like carpets, curtains, and upholstered furniture naturally absorb sound, reducing echo. This doesn't mean you should cram all your gear into a tiny closet; just be mindful of the acoustic properties of your chosen space.
Acoustic Treatment on a Budget
While expensive acoustic foam panels can be effective, there are budget-friendly alternatives. Strategically placing blankets or thick rugs on the walls can dampen reflections. Bookshelves filled with books can act as diffusers, scattering sound waves and preventing buildup in specific areas. These simple solutions can drastically improve your recordings.
Positioning Your Gear
Microphone and instrument placement is crucial. Experiment with different microphone positions to find the “sweet spot” that captures the best sound. Moving your microphone even a few inches can dramatically alter the tone. Consider the direction your instruments are facing and their interaction with the room’s acoustics.
Technological advances and market accessibility have made home recording a viable professional pursuit. Affordable recording equipment and software, such as DAWs and USB microphones under $100, have fueled a surge in home music creation. Find more detailed statistics here: https://frontmanphilosophy.com/music-industry-stats/. This accessibility has empowered aspiring musicians to create professional-quality music from home.
Gear That Actually Makes a Difference (And What's Just Hype)
So, you're ready to embark on your home recording journey. You're probably envisioning a studio filled with all the latest gear: microphones, interfaces, software, and more. But before you empty your wallet, let's discuss what equipment truly elevates your recordings and what's simply clever marketing.
The Essentials: Microphone, Interface, and Monitors
The foundation of any home studio rests on three pillars: the microphone, the audio interface, and studio monitors. A quality microphone accurately captures your sound source, the interface connects your instruments and microphones to your computer, and studio monitors offer precise playback so you can critically evaluate your recordings.
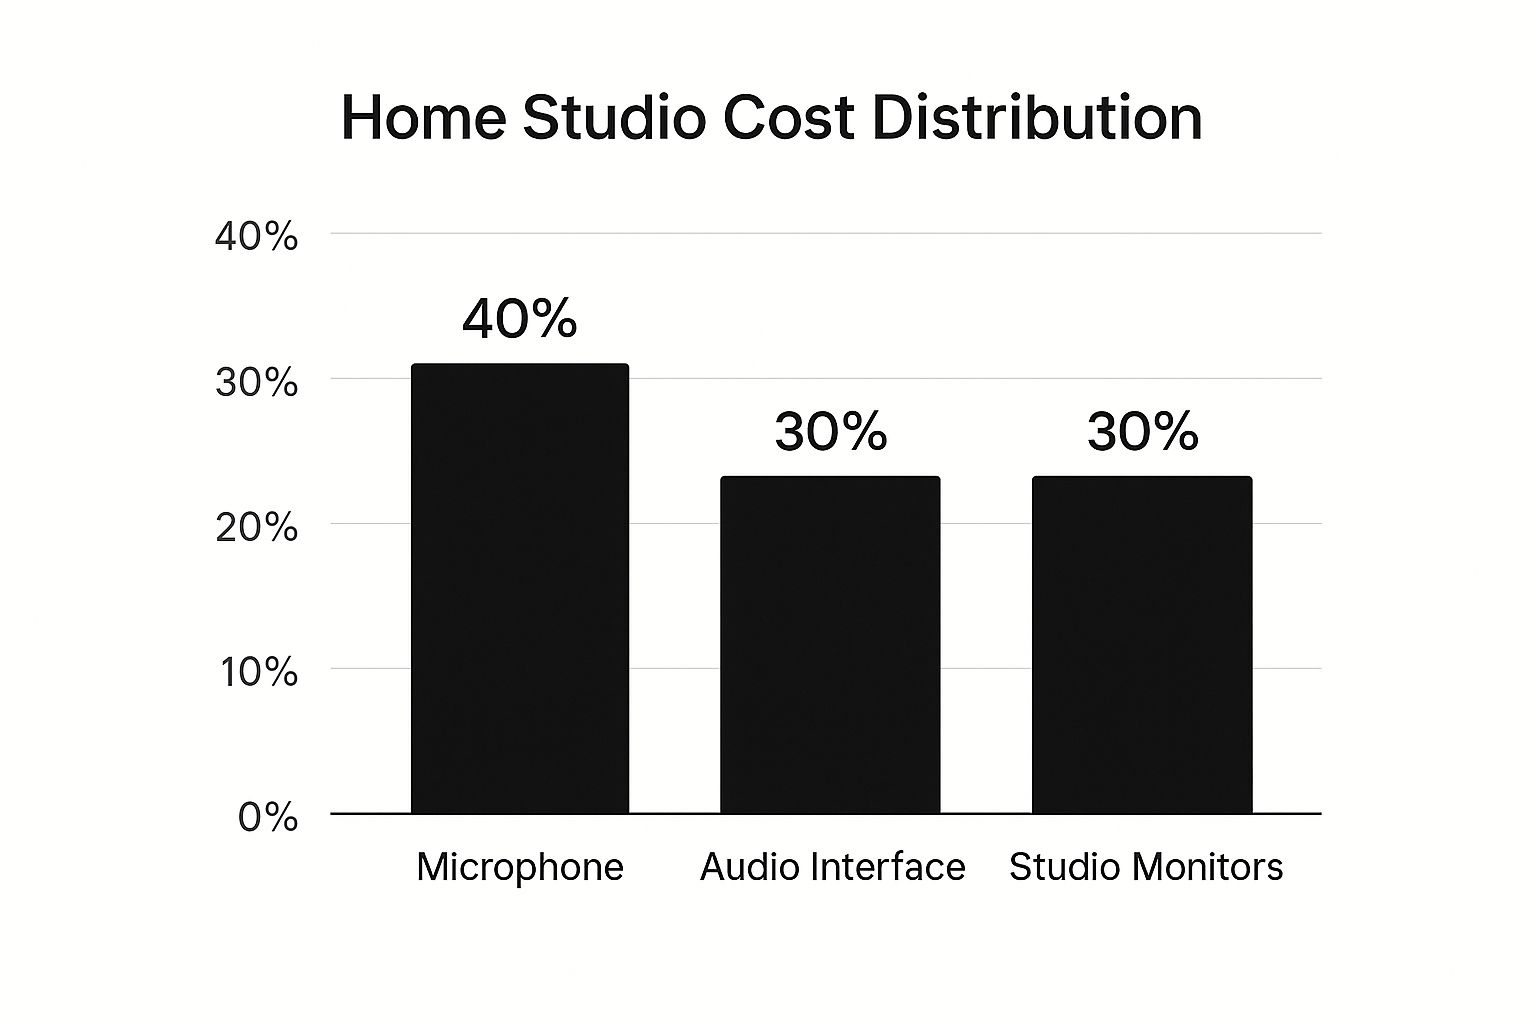
This chart illustrates the typical cost breakdown for these three essential components. The microphone generally represents the largest investment, followed by the audio interface and then studio monitors. This underscores the importance of selecting the right microphone for both your specific needs and your budget.
Quality Over Quantity (and Price)
It might surprise you to learn that a $50 microphone can sometimes outperform a $500 model, particularly in a home setting. This isn't to discredit expensive microphones; they often require specialized acoustic treatment to reach their full potential, a feature most home studios lack.
For instance, a dynamic microphone might be perfectly suited for recording powerful vocals or drums in an untreated room, while a sensitive condenser microphone could capture unwanted ambient noise. The key is selecting the right tool for the task, not simply the most expensive option. Learn more in our article about how to produce music at home.
Building Your Studio Smartly
One common pitfall for beginners is purchasing all their equipment at once. Instead, start with the essentials: a reliable microphone, a basic audio interface, and closed-back headphones. A USB microphone can be an excellent starting point, eliminating the initial need for a separate audio interface.
As you hone your skills and your needs evolve, you can gradually upgrade your setup. Also, consider exploring the used market; you can often find incredible deals on high-quality equipment.
To help you navigate your equipment choices, let's look at a comparison of options at different budget levels:
The table below, "Essential Home Recording Equipment Comparison," helps compare starter, intermediate, and professional equipment options, along with their typical price ranges and key features.
| Equipment Type | Starter Option | Intermediate Option | Professional Option | Price Range |
|---|---|---|---|---|
| Microphone | Dynamic Microphone (e.g., Shure SM58) | Large-Diaphragm Condenser Microphone (e.g., Audio-Technica AT2020) | High-End Condenser Microphone (e.g., Neumann U87 Ai) | $50 – $2000+ |
| Audio Interface | USB Microphone or 2-Channel Interface (e.g., Focusrite Scarlett Solo) | 4-Channel Interface (e.g., PreSonus AudioBox USB 96) | High-End Interface (e.g., Universal Audio Apollo Twin X) | $50 – $1500+ |
| Studio Monitors | Closed-Back Headphones (e.g., Audio-Technica ATH-M50x) | Entry-Level Studio Monitors (e.g., KRK Rokit 5 G4) | High-End Studio Monitors (e.g., Yamaha HS8) | $50 – $1000+ |
This table highlights the significant price differences between equipment tiers. While starter options are budget-friendly, professional-grade equipment offers superior performance and features, reflecting the investment. Careful consideration of your needs and budget will guide you toward the optimal setup.
Avoiding Marketing Traps
The music production industry is saturated with marketing campaigns that promise instant sound improvement with the latest gadgets. However, your skills and technique remain the most crucial elements in achieving high-quality recordings.
Don't get caught in the trap of believing that expensive equipment is the sole path to great music. Concentrate on mastering the fundamentals of recording and mixing, and your results will improve regardless of your gear. This brings us to the next important step: selecting the right Digital Audio Workstation (DAW).
Finding Your Perfect Digital Audio Workstation Match
Choosing the right Digital Audio Workstation (DAW) is a crucial first step when setting up your home recording studio. The sheer number of options, from free software like GarageBand to industry standards like Pro Tools, can be overwhelming. Remember, the best DAW for you isn't always the one with the most features. It's the one that best suits your individual workflow.
Understanding Your Needs
Before exploring specific DAWs, consider your musical style, technical abilities, and long-term goals. Are you a songwriter focused on capturing demos? Or are you aiming for polished, radio-ready tracks? Your answers will guide you toward the right DAW.
Free vs. Paid: Finding the Right Balance
For beginners, free DAWs like GarageBand (Mac) or Cakewalk by BandLab (PC) provide a great starting point. They often include core features like recording, editing, and basic mixing, letting you learn the ropes without spending any money.
As you improve, consider upgrading to a paid DAW. These often offer advanced features, greater flexibility, and enhanced performance. This echoes the idea of building your studio strategically, as discussed in the previous section on essential recording equipment.
Exploring Popular DAWs
Here's a brief look at popular DAWs and their strengths:
- GarageBand: Ideal for beginners on Mac, with a user-friendly interface and all the essentials.
- Cakewalk by BandLab: A powerful free option for PC users. It has a more complex interface but extensive capabilities.
- Logic Pro X: Apple's professional DAW. It builds upon GarageBand with advanced features and powerful tools.
- Ableton Live: Popular for electronic music production and live performance, known for intuitive workflow and looping features.
- Pro Tools: The industry standard for recording and mixing, favored by many studios and professional engineers.
The DAW market caters to all skill levels and budgets. The growth of home recording has significantly impacted the global music recording market. This shift in recording technology changes how music is made and consumed. Learn more here: https://www.thebusinessresearchcompany.com/report/music-recording-global-market-report. As more musicians record at home using DAWs and affordable equipment, the industry continues to evolve.
Mastering Essential Workflows
Regardless of the DAW, many core workflows are the same. Learning these processes will allow you to easily switch between platforms. These are also the skills that separate amateur recordings from professional ones.
- Recording: Understanding gain staging, microphone techniques, and audio editing are crucial.
- Arranging: Mastering the arrangement view, working with MIDI, and arranging audio clips are vital for song structure.
- Mixing: Learning to use EQ, compression, reverb, and other effects is key for creating a polished, balanced mix.
Focusing on these workflows improves your current recordings and prepares you for future software transitions. Now that we've looked at DAW selection, let's explore how to effectively record different instruments in your home studio.
Capturing Every Instrument Like a Pro in Your Living Room
Your home studio might not be Abbey Road, but with the right approach, your recordings can still possess a professional sheen. This section delves into the techniques artists use to achieve impressive results at home, covering everything from capturing clear vocals and powerful drums to managing loud instruments and adding depth through overdubbing. 
Microphone Techniques for Untreated Rooms
Many home studios lack proper acoustic treatment. However, this isn't an insurmountable hurdle. Close-miking is a powerful technique that helps overcome this challenge. By positioning the microphone very near the instrument or voice, you primarily capture the direct sound, minimizing the unwanted room reflections.
For vocals, place the microphone just a few inches from the singer's mouth. A pop filter will help reduce plosives (those harsh bursts of air from “p” and “b” sounds). This technique helps isolate the vocal track and mitigates the impact of the room's acoustics. Using dynamic microphones, which are less sensitive to ambient noise than condenser mics, can further enhance the clarity of your recordings.
Taming Loud Instruments and Happy Neighbors
Recording loud instruments like drums or electric guitar in a home environment can be tricky. Using amp simulators like Amplitube or virtual instruments (VIs) is an excellent solution. These software-based tools emulate the sounds of real amplifiers and instruments, eliminating the need for high-volume amplification.
Another approach is to be mindful of your recording schedule. Recording during off-peak hours or simply communicating with your neighbors can prevent disturbances and maintain positive relationships. It's a practical reminder that successful home recording requires more than technical proficiency.
Overdubbing: Building Depth and Complexity
Overdubbing, the technique of recording multiple tracks separately and then combining them, is crucial for creating layered and textured music. It allows you to record each instrument individually, ensuring the best possible sound and performance for each part.
You might start by recording a rhythm guitar track, then overdub a lead guitar part, followed by bass, vocals, and any other instruments. This process not only improves the clarity of each instrument but also unlocks creative opportunities for harmonies and counter-melodies. Overdubbing is a fundamental aspect of modern recording and a great way to add depth to your home recordings.
Troubleshooting Common Home Recording Problems
Troubleshooting is often part of the home recording process. Clipping is a common issue where the audio signal is too strong, resulting in distorted sound. Adjusting the input gain on your audio interface can resolve this, ensuring the signal stays within an acceptable range.
Latency, a delay between playing an instrument and hearing it through your monitors, is another frequent problem. This can disrupt the recording process, especially for drummers and guitarists. Many audio interfaces offer low-latency monitoring, providing real-time feedback during recording.
To help you get started, we've compiled a quick reference guide for recording different instruments:
Instrument Recording Techniques Reference
Quick reference guide for optimal microphone types, placement, and settings for different instruments
| Instrument | Recommended Microphone | Placement | Preamp Settings | Common Issues |
|---|---|---|---|---|
| Vocals | Condenser or Dynamic | Close-miked (a few inches from the source) | Adjust gain to avoid clipping | Plosives, sibilance, room noise |
| Acoustic Guitar | Condenser | 12th fret, soundhole, or a combination | Experiment to find the sweet spot | Boomy sound, string noise |
| Electric Guitar | Dynamic or Condenser (on amp) | Close to speaker cone or use an amp simulator | Adjust gain and EQ to taste | Harshness, unwanted distortion |
| Drums | Dynamic (close) and Condenser (overhead) | Close to each drum and above the kit | Careful gain staging and EQ are essential | Phase issues, bleed from other drums |
This table offers a solid starting point for your recording journey. Remember, experimentation is key. Adjusting these suggestions to fit your specific equipment and instrument is crucial for achieving the best possible results. Recording at home is as much about understanding your tools and techniques as it is about the music itself.
Mixing Secrets That Work on Headphones and Cheap Monitors
Professional mixing doesn't require a fortune; it requires a trained ear and clever techniques. Many successful artists have crafted polished mixes in less-than-perfect environments. This means you, too, can achieve professional-sounding results right from your home. Let's explore some mixing secrets that work even with headphones and budget-friendly monitors.
The Power of Reference Tracks
One of the most effective mixing techniques, especially on budget setups, is using reference tracks. A reference track is a professionally mixed and mastered song in a similar genre to your own. By comparing your mix to a reference track, you can pinpoint areas where your mix might be lacking, such as the low-end or overall clarity. For example, if the reference track has a punchier kick drum, you might need to adjust the EQ or compression on your own kick.
Mixing on Headphones: Tips and Tricks
Mixing solely on headphones presents unique challenges. They can exaggerate stereo separation and make it difficult to judge low-end frequencies accurately. However, with the right approach, headphones can be a valuable tool. One key strategy is to regularly check your mix on different playback systems, including your car stereo or phone speakers. This gives you a broader perspective on your mix's balance. You might be interested in: Audio mixing tips that will enhance your home recording skills.
Making the Most of Budget Monitors
While high-end studio monitors offer superior accuracy, budget-friendly monitors can still deliver impressive results. Positioning is crucial. They should form an equilateral triangle with your head, ensuring a balanced stereo image. Using isolation pads can minimize vibrations and improve low-end clarity.
Processing Tools for Home Recordings
Certain processing tools can drastically improve home recordings. EQ allows you to sculpt the frequencies of each instrument, removing unwanted resonances and boosting desirable characteristics. Compression helps control the dynamic range, making tracks sound fuller and more polished. Reverb adds a sense of space and depth, creating a more professional soundscape. Understanding when and how to use these tools is essential, as overuse can lead to a muddy or unnatural sound. Start with subtle adjustments and listen carefully. Focus on enhancing the natural qualities of your recordings, not masking imperfections.
Loudness Without Dynamic Destruction
Achieving competitive loudness without sacrificing dynamic range is a common challenge. Over-compressing to make a mix louder often results in a lifeless sound. A more effective approach is to use a limiter on your master bus. A limiter sets a ceiling for the overall loudness, preventing clipping while preserving the dynamic nuances of your music.
The rise of home music recording is closely tied to the digital distribution of music. The emphasis on streaming platforms empowers independent artists to share their work globally. This accessibility has opened up a world of opportunities for aspiring musicians. Mastering these mixing techniques will help ensure your home recordings stand out. Explore this topic further: https://www.ifpi.org/wp-content/uploads/2024/03/GMR2025_SOTI.pdf.
Getting Your Home Recordings Heard by the Right People
Creating great music at home is a fantastic accomplishment. However, getting it heard by the right audience is a separate challenge. This section explores how independent artists can effectively use online platforms to build a dedicated fan base directly from their home studios.
Leveraging Distribution Platforms
Modern distribution platforms make sharing your music globally easier than ever. Services like DistroKid, TuneCore, and CD Baby distribute your tracks to major streaming platforms such as Spotify, Apple Music, and Amazon Music. This makes your music accessible to millions of potential listeners.
Choosing the right platform depends on your individual needs and budget. Research each option carefully to understand their pricing models, royalty structures, and additional services. Each platform offers a unique set of features, so finding the best fit for your goals is important.
Building an Authentic Social Media Presence
Social media is essential for connecting with fans and promoting your music. Focus on building genuine connections by sharing your creative process and offering behind-the-scenes glimpses into your home studio. Actively engage with your followers, responding to comments and messages.
Platform-specific content is key. Short, engaging videos on TikTok and Instagram can be highly effective for reaching new listeners. More in-depth discussions and updates can thrive on platforms like Twitter and Facebook. Focus on the platforms where your target audience is most active.
Engaging Content Around Your Music
Creating compelling content around your music builds anticipation and fosters deeper connections with your listeners. Consider releasing behind-the-scenes videos of your recording process. Share lyrics and the stories behind your songs. Even live-streaming performances from your home studio can significantly increase fan engagement.
Think of your music as more than just audio. It's a story, a world you're inviting your audience to enter. By offering a glimpse into your creative process, you create a richer experience for your fans.
Marketing on a Zero Budget
Effective music marketing doesn't require a large budget. Collaboration is a powerful tool. Partnering with other independent artists, bloggers, or playlist curators can significantly expand your reach.
Cross-promotion offers mutual benefits. You expose your music to a new audience while your collaborators gain reciprocal exposure. Consider guest appearances on other artists’ tracks or joint live-stream performances. These collaborative efforts can be highly effective marketing strategies.
Gathering Meaningful Feedback
Feedback is crucial for growth as an artist. Share your work-in-progress with trusted listeners or online communities for valuable insights. Don't be afraid of constructive criticism; it can help you identify areas for improvement in your music and marketing approach.
This process not only refines your craft but also builds community around your music. It turns listeners into invested fans, eager to follow your journey. Making great music at home is just the beginning; sharing it effectively is what truly makes a difference.
Key Takeaways for Home Recording Success
This section covers the essential steps for a rewarding home recording experience. These takeaways focus on building good habits and making informed decisions, regardless of your experience level.
Start Small, Grow Smart
Begin with the basics: a good microphone, a simple audio interface (or a USB microphone), and closed-back headphones. Upgrade your equipment as your skills and needs develop. For example, a multi-channel interface might be necessary as you start recording more instruments.
Acoustic Treatment Matters (But Doesn’t Have to Be Expensive)
Managing your room's acoustics is vital. Start with affordable solutions like blankets, rugs, and bookshelves to control reflections and enhance your sound. Strategically placed blankets, for instance, can drastically reduce unwanted reverberations.
DAW Mastery: Focus on Fundamentals
Your Digital Audio Workstation (DAW) is your central hub. Select one that suits your workflow, starting with free options like GarageBand or Cakewalk by BandLab. Master the core processes like recording, arranging, and mixing. These skills are transferable across any DAW.
Microphone Placement: The Key to Capturing Great Sound
Experiment with different microphone positions to find the optimal sound for each instrument. Even minor adjustments can significantly improve your recordings. Close-miking, placing the microphone near the sound source, is very effective in untreated rooms as it minimizes room reflections.
Mixing: Reference Tracks and Smart Processing
Use reference tracks to guide your mixing choices, particularly with budget setups. Comparing your mix to a professionally mastered song can highlight areas for improvement. Applying EQ, compression, and reverb subtly can significantly enhance your sound. A touch of reverb, for example, can add depth and space to vocals.
Share Your Music: Distribution and Marketing
Use online platforms like DistroKid or TuneCore to distribute your music to streaming services. Develop an authentic social media presence to connect with fans. Creating engaging content related to your music, such as behind-the-scenes videos, can generate excitement and foster fan engagement.
By following these key takeaways, you can transform your home recording experience into a fulfilling creative pursuit. Focus on regular practice, informed decision-making, and always prioritize the music.
Ready to take your home recording to the next level? ChordX is the perfect resource for musicians, producers, and songwriters seeking to elevate their craft. Explore expert tips, in-depth tutorials, and actionable insights on every aspect of modern music production.


