
Transforming Your Space Into a Recording Haven
You don’t need a purpose-built, soundproofed room to capture incredible vocals. In fact, some of the most memorable home recordings happen in the most unexpected places. The secret is learning to work with your environment, not against it. Forget major construction; your goal is to control reflections and minimize unwanted noise using what you have. This is a core part of learning how to record vocals at home like a pro.
Finding Your Room’s Sweet Spot
Every room sings its own tune, acoustically speaking. Large, empty rooms with hard surfaces—think kitchens or bathrooms—are your enemies. They create a wash of echoes, or reverb, that will make your vocals sound distant and muddy. Instead, seek out spaces filled with soft, sound-absorbing materials.
Your bedroom is often a fantastic place to start because it’s usually kitted out with a bed, curtains, and a rug. The MVP of home recording spots? A walk-in closet. A closet packed with clothes is a natural sound trap, creating a "dead" space that's perfect for capturing a dry, clean vocal take. This gives you a clean slate to add effects like reverb later in your mix, rather than being stuck with the unflattering echo of a poorly suited room.
To help you choose the best spot in your house, here's a quick comparison of common room types and their acoustic properties.
| Room Type | Natural Acoustics | Treatment Required | Best For |
|---|---|---|---|
| Walk-in Closet | Very "dead" and dry due to clothing absorbing sound. | Minimal; the clothes do most of the work. | Capturing clean, direct vocals with maximum control for post-production. |
| Bedroom | Moderately controlled, thanks to a bed, rug, and curtains. | Medium; use blankets and position the mic away from walls. | A good all-rounder, balancing convenience with decent sound. |
| Living Room | Mixed; can be echoey but furniture helps break up sound. | High; requires creative use of blankets, pillows, and furniture. | Tricky, but possible if you can create a small "dead zone" for recording. |
| Bathroom/Kitchen | Highly reflective and echoey due to tile and hard surfaces. | Extreme; not recommended without professional treatment. | Generally unsuitable for clean vocal takes. Avoid if possible. |
As you can see, a walk-in closet is your best bet for a clean recording, but a well-managed bedroom is a close second and often more practical. The main takeaway is to avoid large, empty rooms with hard surfaces at all costs.
DIY Acoustic Treatment on a Budget
Before you rush to buy expensive foam panels, try some DIY solutions. You'll be surprised at how effective they can be.
- Build a Blanket Fort: Drape heavy blankets or duvets over a couple of mic stands to create a makeshift vocal booth around your microphone. This simple trick is great for blocking reflections from the sides and behind you.
- Use Furniture as Diffusers: Bookshelves filled with books of different sizes are excellent natural diffusers. They scatter sound waves, preventing them from bouncing back into your mic as a flat, harsh echo.
- Try the Clap Test: Stand in different spots in your room and clap your hands loudly. Pay close attention to the echo. Does it have a long, metallic ring? That's a red flag. Does it sound short and muted? You've found a good spot. This simple test is your secret weapon for finding the least reflective area in any room.
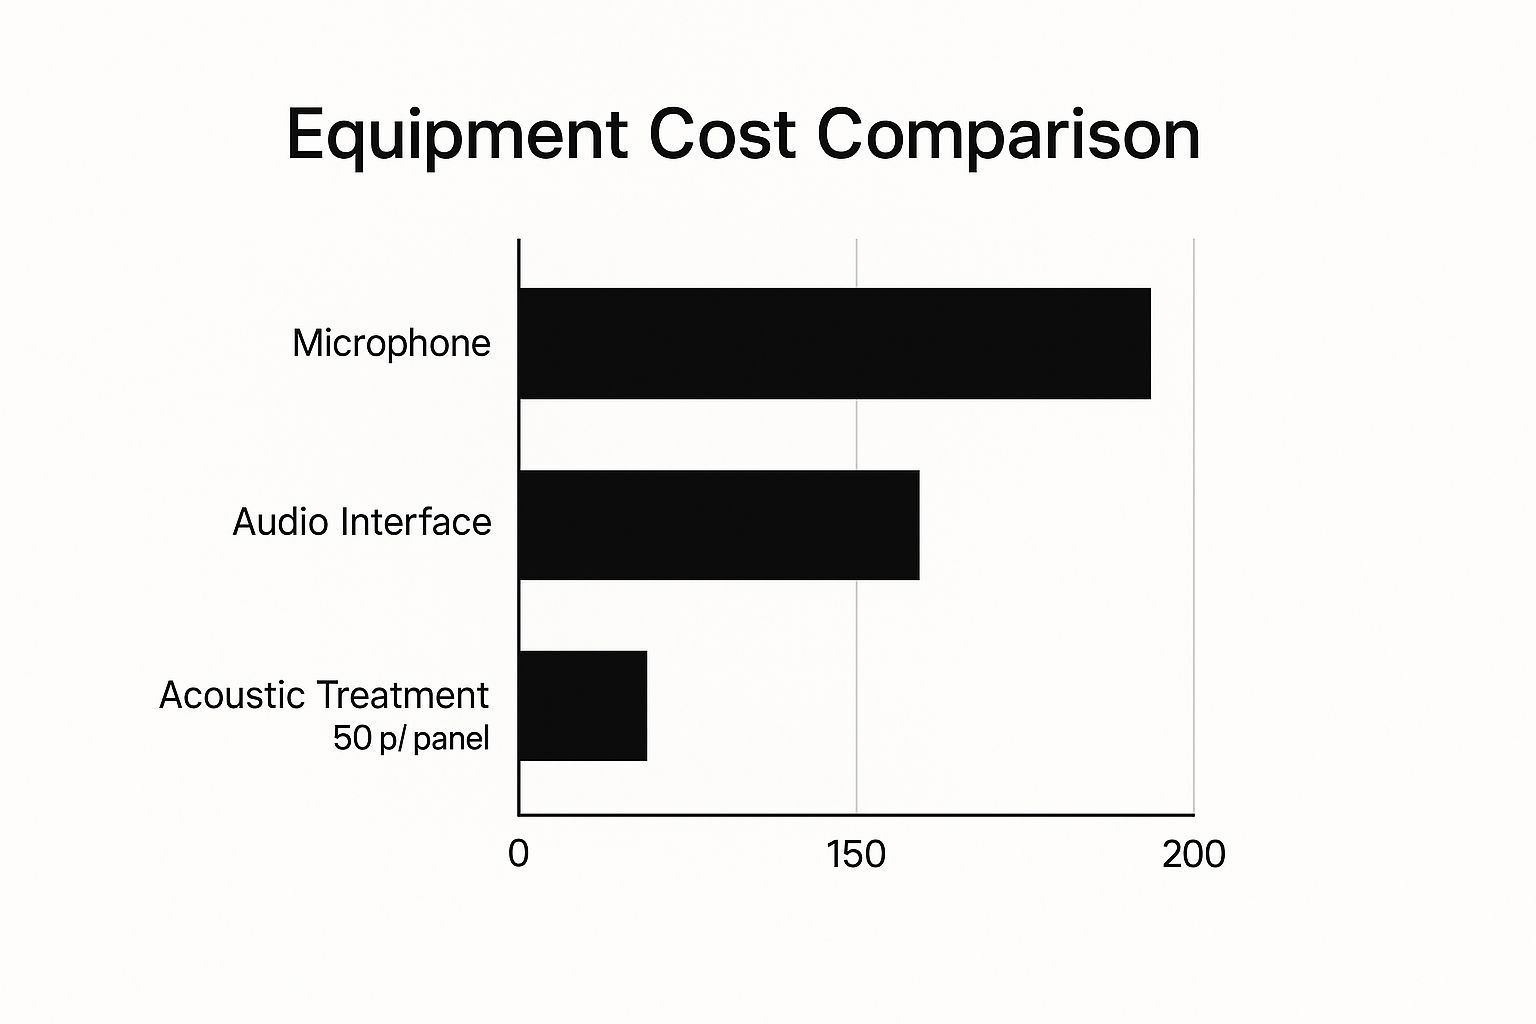
As the infographic shows, you can get a solid starting setup for under $500, with the audio interface typically being the largest initial investment.
This accessibility extends to microphones too. High-quality yet affordable mics like the Rode NT1 5th Gen and Shure SM7B are hugely popular because they deliver professional results even in rooms that aren't perfectly treated. For example, the Rode NT1's incredibly low self-noise and the Shure SM7B's fantastic rejection of background sound make them perfect choices for bedroom producers.
For a more detailed breakdown of the gear you'll need, check out our comprehensive guide on setting up a home studio.
Decoding the Gear That Actually Makes a Difference
Once you’ve found the best possible space in your home, the next piece of the puzzle is choosing the right tools for the job. Walking into a music store or browsing online can feel like stepping into a different world, full of endless options and technical jargon. The key isn't to buy the most expensive equipment, but to make smart choices that fit your space and your voice. This is all about building a reliable setup that captures your performance faithfully without breaking the bank.

The Microphone: Your Voice's First Impression
Your microphone is probably the most critical part of your recording chain. It’s the first thing your voice touches. The two main types you'll come across are condenser and dynamic microphones, and picking the right one often comes down to your recording environment.
-
Condenser Microphones: These are the studio workhorses known for capturing crisp, detailed sound. Mics like the Røde NT1-A are famous for their clarity and low self-noise, making them perfect for picking up every subtle detail of a delicate vocal in a well-treated room. But that sensitivity is a double-edged sword; they will hear everything, from a humming air conditioner to a distant car horn.
-
Dynamic Microphones: These are the tough, road-ready mics you often see on live stages, but they are also fantastic tools for home recording. A dynamic mic like the legendary Shure SM7B is less sensitive to background noise, making it a lifesaver in untreated or noisy rooms. It excels at rejecting sound from the sides and back, focusing only on what’s directly in front of it—your voice. This forgiving quality makes it a top pick for many home recordists.
The global microphone market is growing steadily and is expected to reach USD 10.50 billion in 2025. This surge shows just how many creators are building their own setups. For you, this means more competition among brands and, ultimately, better and more affordable gear to choose from. You can learn more about the rising demand for home recording gear and see how these trends affect you.
The Audio Interface: Your Studio's Hub
Think of the audio interface as the translator between your analog microphone and your digital computer. It takes your mic's signal and converts it into a language your software can understand and record. For most home vocalists, a simple two-channel interface like the Focusrite Scarlett 2i2 is all you need to get started.
When you're shopping around, look for these key features:
- Phantom Power (+48V): This is non-negotiable if you go with a condenser microphone. They need this specific power source to work.
- Clean Preamps: The preamp is what boosts your microphone's quiet signal to a usable recording level. Good preamps do this without adding extra noise or hiss.
- Direct Monitoring: This feature lets you hear your vocals in your headphones in real-time, with zero delay (latency). This is absolutely essential for staying in tune and keeping time with your track.
While there are tons of great options on the market, getting these core pieces right will give you a solid foundation for capturing clean, professional-sounding vocals right from the start.
Mastering the Art of Microphone Placement and Technique

You could have the most expensive microphone on the market, but if your mic technique is poor, your recordings will still sound like they were made in a garage. This is a common hurdle for home recordists, but it's also where you can make a huge jump in quality without spending a single dollar. Learning how to interact with your microphone is a core skill when figuring out how to record vocals at home. It's a blend of technical knowledge and creative expression.
Finding Your Vocal Sweet Spot
The distance and angle between your mouth and the microphone have a massive impact on your vocal tone. There isn't one "correct" position—it’s all about discovering what suits your voice and the song's particular mood.
A great place to start is by setting up the microphone directly in front of your mouth, about 6 to 12 inches away. This usually gives you a balanced, natural sound. Once you're there, it's time to experiment:
- Getting Closer (Proximity Effect): As you move nearer to most vocal mics, you'll notice the proximity effect kicking in, which boosts the lower frequencies. This can give your voice a warm, intimate, "radio DJ" vibe. Be careful, though; get too close, and your vocals will quickly become boomy and muddy.
- Moving Farther Away: Backing away from the mic lessens the proximity effect and captures more of the room's natural sound. This can be perfect for a more open, airy vocal performance, but it's a risky move if your room isn't well-treated, as you'll start picking up unwanted echoes.
- Slightly Off-Axis: Instead of singing directly into the front of the microphone, try aiming your voice slightly to the side. Turning your head just a few degrees can help soften harsh sibilance (those sharp "s" and "t" sounds) and lessen the pop from plosives without making the vocal track sound muffled.
Taming Plosives and Sibilance
Plosives are those sudden bursts of air from "p" and "b" sounds that create a nasty thumping noise on your recording. Your best friend here is a pop filter. You'll want to place it about 2 to 3 inches in front of the microphone. This gap gives the air blast room to slow down and spread out before it hits the sensitive mic capsule.
If you don't have a pop filter handy, the off-axis technique we just talked about works wonders. Another old-school trick is to hold a pencil vertically in front of your lips while you sing. The pencil splits the direct gust of air, acting as a makeshift pop filter. Your posture is also a big deal; standing up straight with open airways will help you deliver a much more consistent and powerful vocal take.
Setting Up Your Digital Audio Workstation for Success
Your Digital Audio Workstation (DAW) is the brain of your home recording setup. It might look complex at first, but you really only need to get a handle on a few key settings to make it work for you. Getting these right is a crucial part of learning how to record vocals at home, as it ensures your ideas are captured cleanly without technical headaches. The goal is to make the technology disappear so you can concentrate on delivering a killer performance.
Optimizing for a Smooth Recording Experience
The most common technical issue you'll run into is latency—that annoying delay between when you sing and when you hear yourself in your headphones. This is managed by a setting called the buffer size. A lower buffer size means less latency, giving you that real-time feedback that's perfect for tracking vocals. The trade-off is that a low buffer size puts more strain on your computer, which can lead to pops, clicks, or other audio glitches.
Conversely, when you're mixing, a higher buffer size is your friend. It gives your computer the breathing room it needs to handle lots of plugins and effects without crashing. It's all about finding the right balance for the task at hand.
To make this clearer, here’s a breakdown of how buffer size affects your recording and mixing sessions. Think of this as your cheat sheet for setting up your DAW.
DAW Buffer Size Settings for Different Recording Scenarios
Optimal buffer sizes for various recording situations and their impact on latency and performance
| Buffer Size | Latency | Best Use Case | System Requirements |
|---|---|---|---|
| 32-128 Samples | Very Low | Recording vocals or instruments where real-time monitoring is critical. | High (demands more from your CPU, requires a powerful computer). |
| 256 Samples | Low | A great all-around setting for tracking with a few plugins and light mixing. | Medium (a safe balance for most modern systems). |
| 512-1024 Samples | Noticeable | Mixing and mastering with many plugins and virtual instruments. | Low (eases the processing load on your computer for stable playback). |
| 2048+ Samples | High | Not for recording. Only use for the final mixdown or mastering phase. | Very Low (provides maximum stability for processor-heavy tasks). |
As you can see, the ideal buffer size really depends on what you're doing. Start low for recording and increase it when you move on to mixing to keep your system running smoothly.
Setting Your Session Up for Creativity
Before you even think about hitting that record button, spend a few minutes organizing your session. This little bit of prep work will save you a ton of headaches later. Start by creating and naming your tracks: one for your instrumental track, one for your main vocal, and maybe a couple of extras for harmonies or ad-libs. It's also a good idea to set the project's tempo and turn on the click track (metronome) to keep your timing sharp.
Next, you need to get your levels right through a process called gain staging. This is all about setting the input level from your audio interface. You want a signal that's strong and clear, but not so loud that it "clips" or distorts. A good target is to have your loudest vocal peaks hitting around -10 dB to -6 dB on your DAW's input meter.
This sweet spot gives you plenty of headroom, which is the space between your loudest peak and the digital maximum (0 dB). Recording with enough headroom ensures you capture a clean, dynamic performance without any digital distortion—something that's impossible to remove later. Once you have these settings dialed in, you can save your session as a template to save time on future recordings.
Recording Techniques That Capture the Magic
With your gear all set up and your room sounding decent, it's time to get to the good part: the performance. This is where all the technical prep pays off and you can focus on bringing the song to life. Knowing a few key recording techniques can make a huge difference in how you capture that perfect vocal. It's all about getting the emotion you feel into a clean, usable audio file.
Perfection vs. Performance: The Art of Comping
Some singers chase the elusive "one-take wonder," believing a single, uninterrupted performance captures the purest emotion. While that can be magical when it happens, it puts a ton of pressure on you to be absolutely perfect. A far more common and practical approach in modern music is comping, which is short for creating a "composite" vocal track.
Here’s the basic idea: you sing the same section of the song—let’s say the first verse—several times, each on its own track in your DAW. After you have 3 to 5 solid takes, you listen back and cherry-pick the best bits from each. Maybe the first line of take one was amazing, but the emotional build-up at the end of take three gave you chills. You simply slice out those best moments and assemble them into one "super" take. This frees you up to perform without the fear that one tiny mistake will wreck an otherwise great recording.
This kind of flexible, home-based workflow is a big reason why the music recording market, valued at around USD 60.73 billion in 2024, continues to grow. More artists are creating professional-quality music from home than ever before. You can discover more about this industry shift toward home production to see how accessible tech is changing the game.
Fixing Mistakes on the Fly with Punch-Ins
So, what happens when you nail an entire verse, but you mess up just one word? Don't sweat it—you don’t have to do the whole thing over. This is exactly what punch-in recording was made for. It lets you replace a tiny piece of an otherwise great take.
Here’s how to do it without anyone ever knowing:
- Find the spot with the mistake. Set your DAW to start playing a few seconds before that point.
- As the track plays, sing along to get back into the same vibe and match the tone of the original performance.
- Your DAW will automatically start recording at the "punch-in" point you set, recording over the bad part.
- Once you’re past the flub, it will stop recording at the "punch-out" point, leaving the rest of your take perfectly intact.
Getting comfortable with punching in is like having a vocal "undo" button. It lets you make quick, seamless fixes so you can stay in your creative flow and get that polished sound you’re after.
Monitoring and Quality Control That Works

Nailing clean takes is a huge part of learning how to record vocals at home, but it’s only half the battle. You also need to hear exactly what you’re capturing in real-time. Without accurate monitoring, you’re flying blind, unable to judge your own performance or spot technical glitches until it’s way too late. Think of your monitoring setup as your personal quality control department, and it all begins with a good pair of headphones.
For tracking vocals, you absolutely need closed-back headphones. There’s a reason why models like the Sony MDR-7506 or the Beyerdynamic DT 770 Pro are mainstays in studios everywhere. They do a fantastic job of isolating sound, which prevents your click track and instrumental from bleeding into the microphone. This isolation isn't just a suggestion; it’s a must-have for a professional-sounding vocal track. Keep your open-back headphones for mixing or just listening to music—they let far too much sound escape for recording.
Creating an Inspiring Headphone Mix
Your headphone mix is more than a technical tool; it’s there to inspire your best performance. Don't settle for a dry, boring sound. A lot of vocalists, myself included, prefer a "wet" monitor mix. This means adding a little reverb or delay to the vocal channel you hear in your headphones. It doesn’t actually get recorded, but it creates the illusion that you're singing within the finished track. This can be a huge confidence booster and often helps with hitting the right notes.
The key is to find a balance where your voice sits comfortably above the music without you having to strain. A great starting point is to pull the instrumental track down a few decibels while bringing up your live vocal. If you find yourself pushing or shouting just to hear your own voice, your backing track is definitely too loud.
Catching Problems in Real-Time
When you're both the artist and the engineer, you have to learn to wear two different hats simultaneously. As you record, put on your producer hat and listen critically. Do you hear any small mouth clicks or distracting breaths? Is that a low hum from the AC unit you tuned out earlier? These are the kinds of details that are simple to fix with a slight mic adjustment but can become a massive headache to edit out later.
Here's a tip I swear by: after you think you've landed the perfect take, pause and listen back to the raw vocal track completely soloed. This simple habit will dramatically improve the quality of your recordings and save you countless hours in post-production. Mastering your own quality control is what separates good home recordings from truly great ones.
Your Roadmap to Vocal Recording Success
So, you’ve made it through the big stuff: transforming your room, picking out gear, and getting a handle on solid recording techniques. Now it's time to bring it all together. Think of this less as a summary and more as your personal action plan for making vocal recordings you're actually excited about. The journey from feeling like a novice to being a confident home recorder is built on good habits and realistic goals. Let's map out that path.
Your Pre-Recording Checklist
A few minutes of prep before you even think about hitting the record button can save you hours of headaches later. Creating a simple "pre-flight" checklist for yourself will get every session off to a smooth start, letting you concentrate on the performance.
- Vocal Prep: Are you hydrated? Have you done a few simple warm-ups? Just like a runner stretches before a race, your voice performs best when it's ready.
- Environment Scan: Is that noisy computer fan running? Did you forget to close the window facing the street? Is your phone on silent? A quick scan for sneaky background noise is a must.
- DAW & Level Check: Fire up your session template. Record a quick test line to make sure your gain is set right. You want your loudest peaks hitting around -10 dB to -6 dB, which leaves plenty of headroom and prevents nasty digital clipping.
Optimizing Your Workflow in the Moment
Once the prep is done, you can shift your focus to being creative. The idea here is to build habits that make the technical side of recording feel like second nature. Treat your first bunch of recordings as practice runs, not the final take. Don't hesitate to play around with different mic positions or vocal comping methods. The goal is to discover what works best for your voice and your sound.
Troubleshooting is just part of the game. If a take sounds boomy or muddy, don't get frustrated—think about why. Are you standing too close to the mic? This is a perfect chance to use what you've learned about the proximity effect. When you treat every little issue as a chance to learn, you'll build the skill to fix problems on the fly without killing your creative momentum.
Post-Recording Evaluation and Growth
After the session wraps up, your job isn't quite finished. This is when you switch hats from performer to producer. Listen back to your raw takes with an honest ear. What parts sound great? What could be improved for next time? This kind of self-critique is probably the most effective tool you have for getting better.
From there, you can start thinking about smart upgrades. Maybe you’ve nailed your mic technique but you're still battling that annoying room echo. It might be time to look into some acoustic panels instead of splurging on a new microphone. The process of learning how to record vocals at home never really ends. It’s a constant balance between the art of performance and the science of sound, always aiming to make your next recording your best one yet.
Ready to continue your music production journey with expert guidance? At ChordX, we provide in-depth tutorials and honest gear reviews to help you create professional-quality music.


